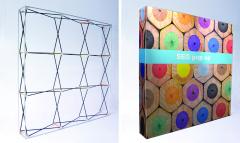
Silicone Edged Graphic/SEG Pop Up Display System
- Introducing an exciting and elegant range of next generation, tensioned fabric pop up display systems, specifically designed to hold Silicone Edged Fabric Graphics (SEG) and offering a sleek and stylish, seamless graphic presentation
- This unique ‘Patented’ system features integral aluminium channel bars and has no loose components, so the frame can be assembled in about 90 seconds, with no tools required. The addition of the fabric graphic will only take a further 5 minutes too
- Multiple frames can be easily connected together with 180 degree or 90 degree ‘Linking Clamps’, to create impressive large straight graphic walls with L-shaped corners. The rear of the frames can also be dressed with graphics to create 360 degree, free standing graphic displays, by simply adding a set of additional channel bars
- The strong, yet lightweight frames are manufactured from a box aluminium tube, offering excellent structural stability and all floor facing hubs feature adjustable feet. These systems are also less than half the weight of traditional magnetic pop up display systems, so are extremely portable
- Systems are available in Straight or Curved frame styles in a choice of 1x3, 2x3, 3x3 and 4x3 plus 1x4, 2x4, 3x4 and 4x4 frame sizes. All systems are supplied in a semi rigid wheeled carry bag with a pouch to hold the fabric graphic
- The final addition to this range is an ultra-lightweight, 1x1 Silicone Edged Fabric Graphic (SEG) pop up display counter with an attractive bamboo counter top and internal shelves
- Options for the main range include halogen or LED flood lights, 90 degree or 180 degree ‘Linking Clamps,’ stabilising feet for straight frames only and a channel bar kit if rear graphics are required
- These systems are the ideal self-build option for any exhibition or event
Assembly Instruction
- Assembly is easy, simply expand the frame into position on the floor, connect the mechanical locking arms together and slide the integral channel bars into position
- To mount the graphic, lie the frame on the floor and gently push the silicone strip on the perimeter of the graphic, into the slot in the channel bars on the front of the frame. Repeat this process for the end cap graphics, then stand the frame up and the graphic will be taught
- Add optional channel bar kit to dress the rear of the frame with graphics and add optional stabilising feet if using a straight frame


